ButterMyBiscuits Etsy Shop

Showing posts with label fabric flowers. Show all posts

Saturday, August 22, 2015

DIY Fall Wreath for only $5!


I bought a green foam wreath at the dollar tree at the beginning of summer. I've been waiting around to see what I was going to do with it. Finally, I decided we needed a new fall wreath for the front door, and voila the $5 fall wreath was born!


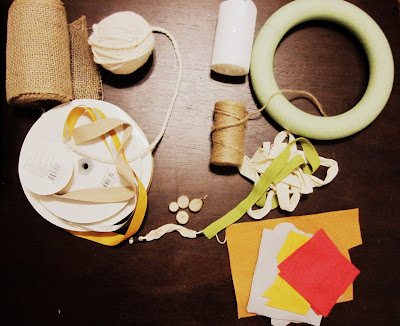
So I got out a bunch of supplies that I had sitting around the craft area...I pulled out felt, ribbon, hemp string, yarn and burlap. However, I only ended up using the felt, fabric ribbon and the foam wreath of course. I'm saying this whole project cost $5 but, it was probably less than that. 

I used hot glue throughout the whole project. 


Once I was about halfway through the wrapping process, I finally figured out the best way to do it. Holding the wreath in my left hand then placing a dot of hot glue where the next piece of yarn goes was the easiest and most efficient way of doing this! Of course I would figure that out once I'm almost finished. 


After you wrap the wreath in yarn, choose your color scheme for your felt flowers. I started with red-orange, yellow and gold...then added black felt leaves and gray as well. 


There's lots of simple ways to create felt flowers. I cut out circles then spiraled them and also experimented with the folded/frayed edge technique. 


I also thought I might use some fabric ribbon rosettes, but ended up leaving those off. They'll incorporate themselves into another project someday. 


How to make the simple felt rosette: 


Start rolling it together from the center and tacking it with little dots of hot glue along the way. 


How to make the folded/frayed edge flower:


Glue the ends together all the way down your strip of felt. 


Roll the flower up using hot glue dots to secure the layers. 


How to make the wavy rosette:

Cut a circle of felt...I made this one a little bigger with a 3 inch diameter. I don't really measure things, so I just guesstimate a size and work with it. 


Cut wavy lines with sharp scissors spiraling inward. 


Just like the other rosettes, start in the center, then wrap and glue the felt around the middle. 
                                      

Playing with placement of your flowers on the wreath before you commit to gluing is always a good idea!  


I added some black leaves for a bold color and extra detail. If I had a muted green, I would have probably used it instead, but today was all about using what I had. 


I used a piece of fabric ribbon for the hanging device and hot glued a golden yellow bow at the top for a sweet finishing detail. To keep the yellow bow from fraying, I just ran a little bit of hot glue along the edge. It's not visible at all...it's just a little tiny bit along the edge. 


I hope you enjoy creating your own version of this simple, yet bold fall wreath! 
Happy creating!


 Copyright @ Erin Scobey 2015

Wednesday, June 19, 2013

Singed Fabric Flower Tutorial

I made these for my bridesmaid's and one big one for me. I think they looked so pretty in their hair and these are fun and easy to make with an element of danger...oooh la la! Scary crafts!


Materials Needed: 
1 small votive candle
100% polyester fabric/ thrift store scarves
needle and matching thread
felt


Step 1: Find some 100% polyester fabric....this cream fabric I bought at JoAnn's and I just read the bolt and made sure it was polyester...although you can experiment with any fabric, you get the best results and no smoke from poly. I tried this with silk and it was too smokey and scary! 

Step 2: Cut your fabric into circles. You know me, I don't measure things...so guesstimate some big, medium and small circles. I'd say you'll use 5-10 circles per flower depended on how "full" you want your bloom to be. 


Step 3: Cut slits around your circles. 


Step 4: Hold one "petal" out over your flame. Use a small candle and you aren't actually putting this into the flame, just get it close enough to the heat to start "curling" your petals. Rotate around your flower until all petals are 'singed'. 


You can layer lacy netted/tulle fabrics in between to add fullness. 

Repeat until you have enough pieces to create the flower you want. 


Step 5: Making a backing....
To make the back, cut a small felt circle and I cut two slits for a bobby pin to live in so you can attach easily to your hair. 

If this isn't a hairpiece, then just sew on your circle of felt and you can hot glue or stitch on a brooch pin. 


Sew your stack of petals to your felt. Don't worry about messy stitches because I ball up a piece of scrap to cover up the mess at the last minute. (See below on my colorful flower...)

And voila! Lovely fabric flowers!


Here's my newly discovered miracle...a sock bun....with my singed fabric flowers. 

I decided I needed another flower for my new orange dress...that I will be wearing the first night of our cruise next week! Woo hoo, Bahamas! Anyway, I made this one from an old scarf I had laying around from Goodwill...


Here's that bunched up fabric scrap I was talking about for the center at the last minute to cover up your stitches. I singed it a little, (carefully!) before I attached it. 


Lovely! Sock bun and all!


Saturday, April 6, 2013

Fabric Flower Tutorial


Here's the easiest way to make fabric flowers...in my opinion...and I am not the inventor of this...and I guess there's tons of these tutorials out there, but I wanted a tutorial on my blog, so let's throw one more on the pile, shall we!


You'll need:
Fabric, Felt, Scissors, Needle and Thread
--------------------------------------------------------
Cut out the following: 

4 large circles
4 medium circles
4 small cirlces
 Remember, I don't measure things. 

Here's what we're making...


I also cut out some random extra pieces to fill in gaps if needed...


This is the dyed fabric from the previous post...I love it!

Step One: Fold a large circle in half. 


Then fold in half again, and sew to the center of your felt base. 

One stitch is plenty..as you will be layering on top to reinforce later. 

Repeat until you have all 4 large circles stitched to base. 


Step Two: Build up the second layer using same folding techniques with your 4 medium sized circles. 

I like to stagger the petals in between the cracks. 


Step Three: Build up your last layer with your smallest circles folded twice then stitched to center. 

Next you get to experiment with your "centerpiece". Here's a Rick Rack Rose as a center....probably a hot glue situation. 

a pearl bead...

Another bead...

Or you could just ball up a small circle and stitch it to finish off the flower...

Here's a variation with different prints...all hand-dyed in "wine" color.