ButterMyBiscuits Etsy Shop

Showing posts with label decor. Show all posts

Saturday, August 22, 2015

DIY Fall Wreath for only $5!


I bought a green foam wreath at the dollar tree at the beginning of summer. I've been waiting around to see what I was going to do with it. Finally, I decided we needed a new fall wreath for the front door, and voila the $5 fall wreath was born!


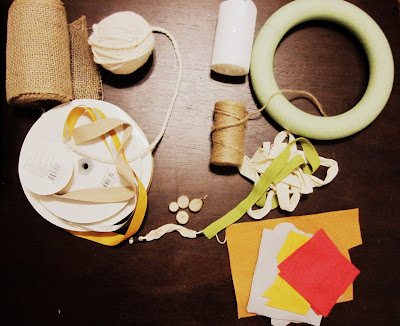
So I got out a bunch of supplies that I had sitting around the craft area...I pulled out felt, ribbon, hemp string, yarn and burlap. However, I only ended up using the felt, fabric ribbon and the foam wreath of course. I'm saying this whole project cost $5 but, it was probably less than that. 

I used hot glue throughout the whole project. 


Once I was about halfway through the wrapping process, I finally figured out the best way to do it. Holding the wreath in my left hand then placing a dot of hot glue where the next piece of yarn goes was the easiest and most efficient way of doing this! Of course I would figure that out once I'm almost finished. 


After you wrap the wreath in yarn, choose your color scheme for your felt flowers. I started with red-orange, yellow and gold...then added black felt leaves and gray as well. 


There's lots of simple ways to create felt flowers. I cut out circles then spiraled them and also experimented with the folded/frayed edge technique. 


I also thought I might use some fabric ribbon rosettes, but ended up leaving those off. They'll incorporate themselves into another project someday. 


How to make the simple felt rosette: 


Start rolling it together from the center and tacking it with little dots of hot glue along the way. 


How to make the folded/frayed edge flower:


Glue the ends together all the way down your strip of felt. 


Roll the flower up using hot glue dots to secure the layers. 


How to make the wavy rosette:

Cut a circle of felt...I made this one a little bigger with a 3 inch diameter. I don't really measure things, so I just guesstimate a size and work with it. 


Cut wavy lines with sharp scissors spiraling inward. 


Just like the other rosettes, start in the center, then wrap and glue the felt around the middle. 
                                      

Playing with placement of your flowers on the wreath before you commit to gluing is always a good idea!  


I added some black leaves for a bold color and extra detail. If I had a muted green, I would have probably used it instead, but today was all about using what I had. 


I used a piece of fabric ribbon for the hanging device and hot glued a golden yellow bow at the top for a sweet finishing detail. To keep the yellow bow from fraying, I just ran a little bit of hot glue along the edge. It's not visible at all...it's just a little tiny bit along the edge. 


I hope you enjoy creating your own version of this simple, yet bold fall wreath! 
Happy creating!


 Copyright @ Erin Scobey 2015

Wednesday, October 8, 2014

T-Shirt Yarn Spider Web Halloween Photo Booth Display

Well, that was a wordy title...but I wanted to give all the guts up front. I was inspired by seeing this done with gray yarn on pinterest...but I needed a little more pizzazz for a bold backdrop. (Just found out how to spell "pizzazz".)

Anyway, here's the final product and how you make it! It wasn't too hard...the tweaking at the last minute will get ya, but after I realized I should have stopped "messing with it" about 5 times it was almost too late and then it just 'settled' into something wonderful and slightly 3-Dish. I'm really excited about this being my Halloween party photo booth backdrop.

I cut these letters from black poster board paper to add a little holiday spirit. 

HOW TO MAKE IT:
Materials Needed
- Black (XL) t-shirt
- Sharp scissors
- Clear or Black Push Pins
- Forgiving Husband
- Patience...maybe like an hour (or watch your favorite scary movie)


 Step One: Cut roughly 1" strips from a black t-shirt....or whatever color you want...you could make a hot pink spider web if that's what you're into. The sky's the limit.


Pull the strip until it gets skinny and curls up. This is how you make the "yarn". 


Amass a pile of yarn which will look like a creepy pile of worms. 


Start by pinning up a large X on the wall space where you will be installing this giant spider web. Luckily my husband doesn't seem to care that I've put zillions of tiny holes in this wall. 
 [ I guess he'll be fixing that later for me. ]


Build your spider web lines with more X's or T's. I stopped at 4 lines (one X and one T)...but you could do a few more for more detail. I call these the "skeletal lines". Everything is Halloween themed right now ya'll. 


Here you can see where I started out thinking a curved web lines would be a good idea....


Then I made the early decision to just tighten them. This was the right decision for my personal sanity....hard to battle against gravity sometimes.


So sometimes I tied a little knot...but most of the time I'd take a long piece and just make a loop around my skeletal lines until I got to the end of my yarn. Each new start requires a new knot, but that's not a big deal. It's easy to work with when your yarn isn't too long. 
Less tangly possibilities. 


Voila! T-shirt yarn spider web! I love how this photo has a green glow to it...oooooh, scary. Radioactive spider web!

Tuesday, October 7, 2014

Fall Break=Halloween Party Decorations Done!

Every year my husband and I throw a Halloween bash with all the fixins. I have accumulated a ton of decorations and pinterest ideas throughout the years. This year we haven't designated a costume theme and instead we are having a costume contest. I haven't officially quit decorating...I just thought I'd get these ideas out there for anyone who is needing ideas.


So, a new addition to the party this year is a photo booth complete with a handmade black t-shirt yarn spider web. For a tutorial on how to make this, click here: tshirt spider web tutorial.


Below you can see me and my wonderful husband modeling the concept.


Standing Pose


Sitting pose

Next we come to one of my new passions...tablescaping, in the words of Gene Belcher: 

"It combines accurate table-setting placement with creative themes and costumes."

My hubster and I are going to be vampires this year...no "Twilight or Buffy/Interview with a Vampire" references. I'd say we're more of your East Nasty rebellious non-conformist type. So here's my tablescape...obviously this will look way different with actual food on it and not just lightbulbs. But here's a good base anyways... 


I made a black spiked bunting that is getting lost in the curtains, so I might replace that elsewhere...


Here you can see my striped witches legs...super easy with masking tape and a cut in half pair of Halloween clearance tights.


Next I bring you to the back of the front door...I tried the spiraling black paper bats. I'm not sure if I'm a fan...but a new way to hang these super cheap-o paper bats I cut out is fine by me. I like using fresh ideas for old things and the budget appreciates that too.


A couple of years ago I made this wire spider web using rebar tie wire and smaller wire. I spray painted the whole thing matte black. This is something I use every year so it was worth the sore fingers of working with rebar tie wire. 


Some painted wooden pumpkins...made from scraps of different sizes of wood. Painted orange and black with acrylic and latex enamel, then hot glued a cut tree branch to the top. 


These are actually pretty creepy. I haven't decided what else to do with this table yet....but it needs something a little more. 

Of course there will be candles everywhere, but I hope you enjoyed your Halloween party sneak peek.