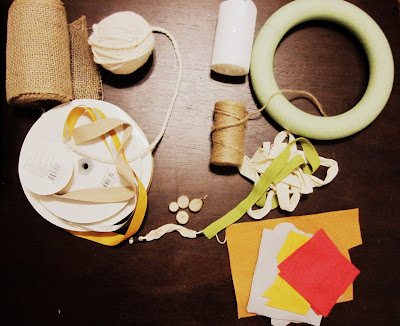
I bought a green foam wreath at the dollar tree at the beginning of summer. I've been waiting around to see what I was going to do with it. Finally, I decided we needed a new fall wreath for the front door, and voila the $5 fall wreath was born!
So I got out a bunch of supplies that I had sitting around the craft area...I pulled out felt, ribbon, hemp string, yarn and burlap. However, I only ended up using the felt, fabric ribbon and the foam wreath of course. I'm saying this whole project cost $5 but, it was probably less than that.
I used hot glue throughout the whole project.
Once I was about halfway through the wrapping process, I finally figured out the best way to do it. Holding the wreath in my left hand then placing a dot of hot glue where the next piece of yarn goes was the easiest and most efficient way of doing this! Of course I would figure that out once I'm almost finished.
After you wrap the wreath in yarn, choose your color scheme for your felt flowers. I started with red-orange, yellow and gold...then added black felt leaves and gray as well.
There's lots of simple ways to create felt flowers. I cut out circles then spiraled them and also experimented with the folded/frayed edge technique.
I also thought I might use some fabric ribbon rosettes, but ended up leaving those off. They'll incorporate themselves into another project someday.
How to make the simple felt rosette:
Start rolling it together from the center and tacking it with little dots of hot glue along the way.
How to make the folded/frayed edge flower:
Glue the ends together all the way down your strip of felt.
Roll the flower up using hot glue dots to secure the layers.
How to make the wavy rosette:
Cut a circle of felt...I made this one a little bigger with a 3 inch diameter. I don't really measure things, so I just guesstimate a size and work with it.
Cut wavy lines with sharp scissors spiraling inward.
Just like the other rosettes, start in the center, then wrap and glue the felt around the middle.
Playing with placement of your flowers on the wreath before you commit to gluing is always a good idea!
I added some black leaves for a bold color and extra detail. If I had a muted green, I would have probably used it instead, but today was all about using what I had.
I used a piece of fabric ribbon for the hanging device and hot glued a golden yellow bow at the top for a sweet finishing detail. To keep the yellow bow from fraying, I just ran a little bit of hot glue along the edge. It's not visible at all...it's just a little tiny bit along the edge.
I hope you enjoy creating your own version of this simple, yet bold fall wreath!
Happy creating!
Copyright @ Erin Scobey 2015


